Schedule a Visit
When a host wants to schedule a visitor in advance, they can do so through the ViziTrac web portal by following the steps below:
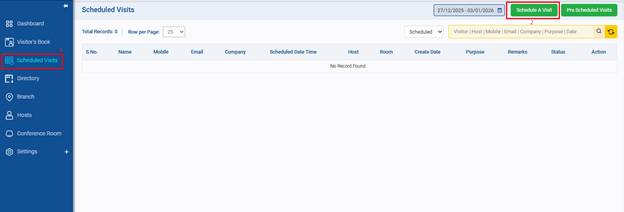
Step 1: Log in to the ViziTrac web portal. From the left-side menu, navigate to Scheduled Visits, then click the Schedule a Visit button.
Step 2: Fill in the Add Scheduled Visit form on the next screen. Fields marked with (*) are mandatory.
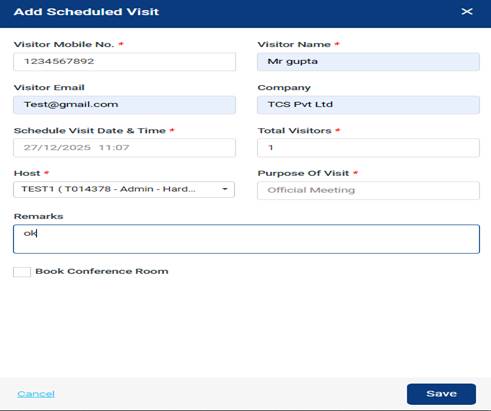
Field Description:
- Visitor Mobile No: Enter the visitor’s phone number.
- Visitor Name: Enter the visitor’s full name.
- Visitor Email: Enter the visitor’s email address.
- Company: Enter the visitor’s company name.
- Visit Date/Time: Select the date and time of the visit.
- Total Visitors: Enter the total number of visitors.
- Host: Select the employee the visitor will meet.
- Purpose of Visit: Select the purpose of the visit from the list.
- Remarks: Enter additional notes, if required (optional).
Step 3: After entering all the details, click Save to store the visitor’s information. The visit will then appear in the Scheduled Visits list for future reference.

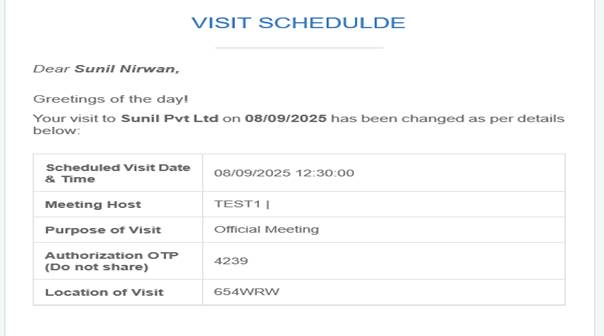
Step 4: - An Authorization OTP will be sent to the visitor’s email, and also by SMS if the SMS service is enabled with the portal.
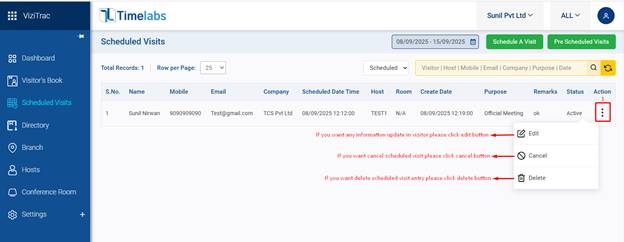
Step 5 : If any details are missing or incorrect in the scheduled visit, select the action button to edit, cancel, or delete the visitor entry.
Pre-Scheduled Visits (Visitor Check-In)
When the visitor arrives at the premises, the HR user or any authorized Host can complete the check-in process using the Pre-Scheduled Visits option. This also allows them to view and manage visits scheduled in advance and quickly check the visitor’s status and details.
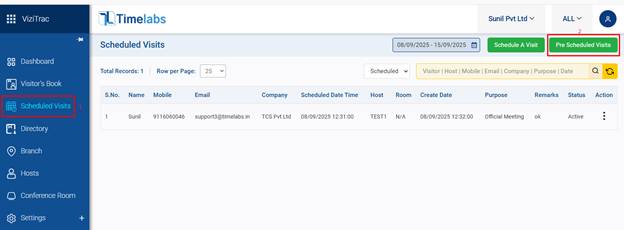
Step 1: Clicking on ‘Pre-Scheduled Visits' which will open below form on next screen.
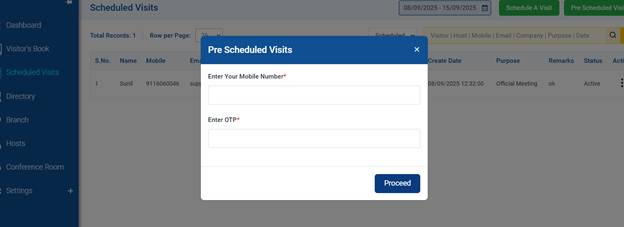
Field description:
- Enter Visitor Mobile Number: Type the visitor's mobile phone number.
- Enter OTP: Enter the One-Time Password that the visitor receives on their email/SMS.
- Proceed: Click the "Proceed" button to continue after filling in the details and verifying the OTP
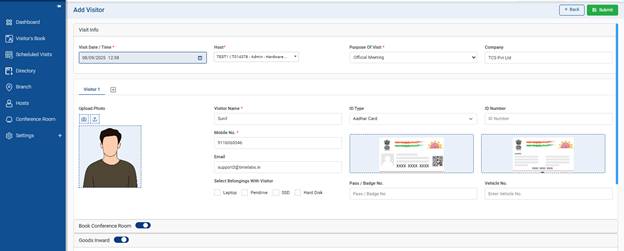
Step 2: After clicking Proceed, the visitor’s details will be automatically fetched from the scheduled visit record. This makes the check-in process quick and seamless.
Note: Additional visitor details such as Aadhaar Card, PAN Card, or other identification information can be added at this stage, if required.
Was this article helpful?
That’s Great!
Thank you for your feedback
Sorry! We couldn't be helpful
Thank you for your feedback
Feedback sent
We appreciate your effort and will try to fix the article